Tactical analysis: Operational area “Open terrain & river course”
The open field. At first glance, the dream of every marksman – clear lines of sight, maximum range. But if you add a river without bridges to this scenario, the seemingly simple battle turns into a tactical game of patience in which mobility triumphs over armor.
In this analysis, we look at a classic scenario: wide, relatively open terrain cut through by a river (depth: level 1). We look at why your heavy tracked vehicles are useless here and how you can force victory with the “Skewed Battle Order“.

The terrain: the wet barrier
The dominant feature of this map is not the plain, but the water. A river with level 1 depth runs through the operational area. What sounds harmless at first is an absolute exclusion zone for conventional vehicle troops.
There are no bridges. This means that the river is a natural border that effectively segments the battlefield. If you don’t have the right equipment here, you will be unable to maneuver, making you an easy target on the open spaces.
Unit selection: Mobility is king
The choice of lance often determines victory or defeat even before the first shot is fired.
❌ Unsuitable: Wheeled and tracked vehicles
Leave your classic tanks (Vedettes, Manticores, etc.) in the hangar.
- The problem: Vehicles with wheel or track drive cannot enter water fields without special equipment (which is usually lacking here).
- As a result, the river becomes an insurmountable wall. Your tactical options are massively restricted, as flanking across the river is impossible. They are forced into predictable corridors.
✅ Recommended: hovercrafts and jump mechs
This is the hour of the highly mobile units.
- Hover vehicles: As they hover above the surface, they completely ignore the terrain penalty of the water. They can use the river to switch sides at lightning speed or stab their opponents in the back.
- Mechs with jump jets: A mech without jump jets is slowed down in the water. A mech with jets, on the other hand, simply jumps over the obstacle. This vertical mobility is worth its weight in gold in this scenario.
Armament: finding the balance
As the terrain is relatively open, there are few Line of Sight (LOS) blockades. This often leads to the deployment of pure long-range boats (LRM carriers, PPC mechs).
Our recommendation: Go for a balanced mix. Since hover and jump mechs can quickly make the battle dynamic, the distance will vary quickly. A pure LRM support is helpless if fast hovercrafts close the distance (“Under the minimum range”).
- Long distance: To put the opponent under pressure as soon as they deploy.
- Medium range: For the main battle.
- Short distance: To fend off fast flankers.
The strategy: The skewed battle formation
Since we have open terrain, a frontal attack is often a bloody losing proposition. Instead, we use the terrain to our advantage. We adapt the classic “ Oblique Orderof Battle”.
The aim is to create a local superiority, while the rest of the front only stalls.
1. the right flank
Here we use the two-part course of the river defensively.
- Task: Hold and bind.
- Advantage: Since the river covers your right flank, the opponent can hardly bypass you here (unless he also only has hover/jump units).
- Units: Lighter units or those with a long range that keep the enemy busy without engaging in close combat are sufficient here. They use the river as a shield.
2. the center
The center serves as a connecting element. It must not break, but does not have to advance. It draws fire, moves defensively and prevents the opponent from breaking through.
3. the left flank
This is where you concentrate your main force.
- Execution: While the opponent is busy on the right and in the middle, use your fastest units (hover, fast jump mechs) on the left.
- The objective: Break through the enemy line where it is weakest, or bypass it over a wide area in order to “roll up” the enemy formation.
- The effect: Since the opponent is blocked on your right side by the river, he cannot bring his troops into your flank fast enough to exert pressure on the right side.
Conclusion
Open terrain with a river course is no place for static warfare. It’s a playground for generals who understand speed. Use the river as a shield on one side and as a highway for your hovercrafts on the other. Force the enemy onto the defensive by taking away their mobility while you dance across the water yourself.
Sample lance
Here is a concrete setup for two lances (8 units in total) that are specifically optimized for the “Leaning Battle Order” strategy in open terrain with a river course. We divide the forces into an “Anvil Lance” (Hold & Ranged) and a “Hammer Lance” (Mobile Attack).
We use the Succession Wars tech level (3025) as a guide, as this is the most common era for such tactical policy discussions, but the logic can also be applied to later eras.
Lance 1: The “holding lance” (right flank & center)
Task: This lance forms the defensive anchor (the retracted side of the slanting order). It uses the river on the right-hand side as a protective shield, binding the opponent at medium to long range with firepower and punishing any attempt by the opponent to cross the river.
Composition:
- CPLT-C1 Catapult
- Role: Remote support (LRM boat).
- Why here: The jump jets allow him to quickly take up ideal firing positions behind cover or even on the other side of the river if the enemy tries to ignore the flank.
- GRF-1N Griffin
- Role: Mobile sniper.
- Why here: With his PPK (PPC) and LRM-10, he can stay at range. His excellent jumping ability makes him hard to hit while he “kited” (strafed and dodged) the enemy.
- Drillson Heavy Hover Tank
- Role: Fast harasser/support.
- Why here: Equipped with a Large Laser and LRM-10 as well as SRMs. The Drillson is robust enough for a hovercraft and can close fire gaps if the enemy gets too close.
- Saracen Medium Hover Tank
- Role: Bodyguard/Crit-Seeker.
- Why here: It protects the Catapult and Griffin from fast enemy units or if the enemy attempts a breakthrough on the right flank.
Lance 2: The “attack lance” (left flank)
Task: This lance is the offensive spearhead. It uses its extreme speed to advance on the open left flank, bypass the enemy line (flanking) and then strike hard.
Composition:
- WVR-6M Wolverine
- Role: Brawler / leader of the attack lance.
- Why here: With jump jets, he’s mobile enough to keep up with the hovercrafts and tank the main damage. Since it has OV1, it can also stay in the river and take advantage of the extra cool down
- JR7-D Jenner
- Role: Striker / Backstabber.
- Why here: One of the fastest mechs with jump jets. It uses the open terrain for maximum speed (evasion bonus). Its task is to jump across the river into the backs of enemies who are distracted by the Hold Lance.
- Saladin Assault Hover Tank
- Role: Glass cannon / blockade runner.
- Why here: Equipped with a massive AC/20, it is very lightly armored but deadly on the open field with its speed. It races forward on the left flank and delivers the “attack” blow against heavy enemy units.
- Pegasus Scout Hover Tank
- Role: Spotter / Finisher.
- Why here: Extremely fast and maneuverable. It provides targeting data for the Catapult’s LRMs (Lance 1) and uses its SRMs to take out damaged enemies whose armor has been opened by the Saladin or Wolverine with critical hits.
Tactical synergy on the map
- Phase 1 (deployment): The Halten lance positions itself defensively on the river bank (right). The Catapult and the Griffin open fire at maximum range. The hovercrafts remain in reserve.
- Phase 2 (contact): The opponent will try to react to the strafing lance. As he cannot easily cross the river (wheel/chain), he must face it head-on.
- Phase 3 (The attack): As soon as the enemy focuses on the right flank/center, the assault lance charges forward over the left, open side. The
Wolverinedraws fire while theSaladinandJennertry to get into the rear of the enemy formation. - The river joker: If the opponent tries to turn against the attack, all your units (thanks to hover and jump jets) can simply cross the river and change sides – the opponent (with wheel/chain) cannot. So you dictate at all times which side of the river to fight on.
A practical example
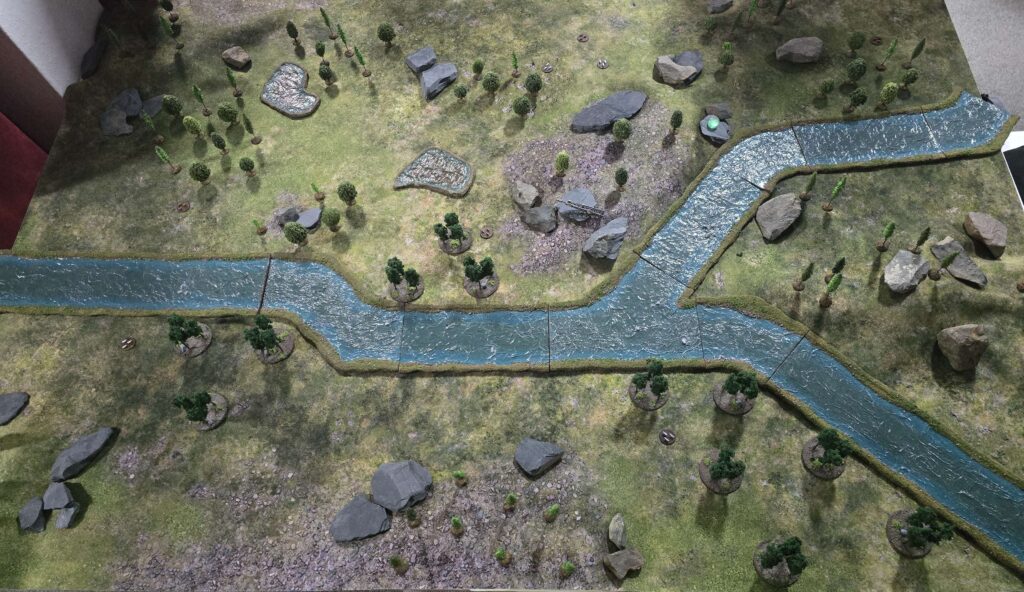
Situation: We start at the southern edge of the map. In front of us lies the open terrain, crossed by the course of the river (level 1 depth), which meanders from northeast to southwest. Objective: Establish the “sloping order of battle”. We don’t want to offer the enemy a flat front, but rather establish a diagonal line that forces him to make a decision.
Playing field analysis
Before we place units, we have to read the terrain. At first glance, the map looks open and inviting for quick battles, but appearances are deceptive. The topography here dictates a very clear asymmetrical approach.
1. the body of water: the dominant factor
The central element is a river course with depth level 1.
- No infrastructure: there are neither bridges nor fords. The river is an absolute no-go area for conventional wheeled and tracked vehicles without amphibious equipment.
- The fork (right flank): The most critical feature is the fork in the river on the right-hand side. Here the water divides and forms a “Y”.
- Tactical implication: This makes the right flank a defensive nightmare for attackers and the perfect fortress for defenders. If you want to attack here, you have to cross not just one, but potentially two watercourses. Freedom of movement is massively restricted here.
2. vegetation and obstacles
The terrain is littered with “litter cover” – many small woods (mostly light forest) and occasional rock formations (or scree).
- Lines of sight (LOS): Since there are hardly any massive blockades (high hills or heavy forests), the lines of sight are largely open. The terrain offers hardly any places to hide completely.
- Cover quality: The small forests and rocks usually offer only partial cover or make it difficult to hit (+1/+2 modifier), but rarely break the line of sight (LOS).
- Conclusion: A paradise for long-range weapons. If you stand still, you die. Cover here must be generated by movement (TMM – Target Movement Modifier), not by terrain.
3. movement corridors
Due to the lack of roads, there is no “quick route” via the map.
- Center & Left: Relatively open. Speed can be built up here. Ideal for flanking maneuvers.
- Right: Strongly fragmented by the river bifurcation. This creates a natural “funnel” or bottleneck.
Strategic conclusion
This map literally cries out for the “Skewed Battle Order”. The right side (river fork) is naturally protected by the terrain. Units can entrench themselves between the arms of the river and hardly have to fear flank attacks, as the enemy is hindered by the water. The left side, on the other hand, offers the necessary space for rapid advances. The terrain therefore almost automatically forces us to hold on the right (attack) and strike on the left (hold).
The tactical line-up
In the first round, the focus is 100% on optimal positioning.
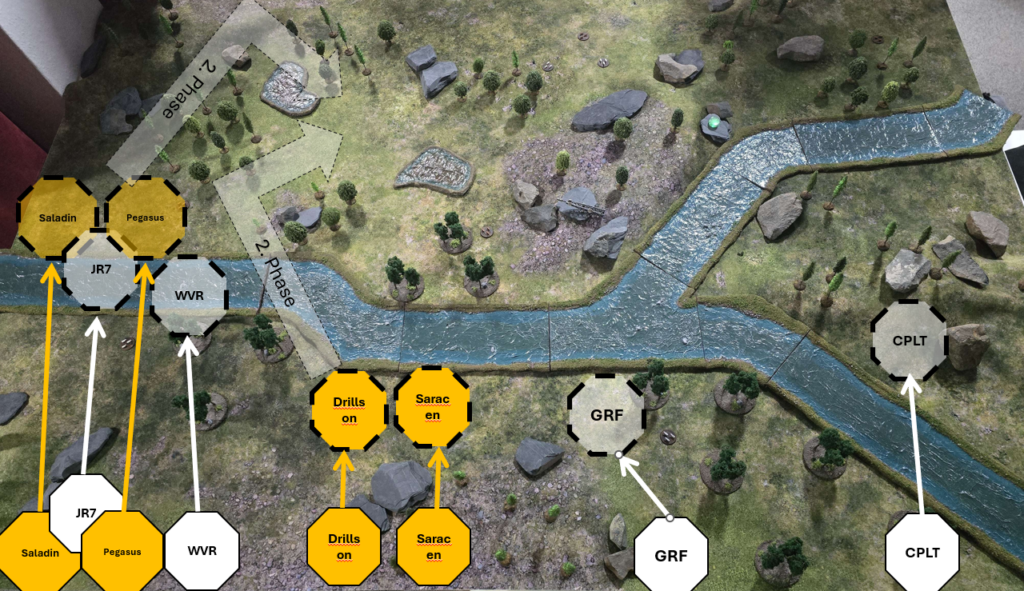
1. the right flank – “hold back”
Lance 1 (Catapult, Griffin, Drillson, Saracen)
We move defensively here. We don’t want to move far forward, but rather take up good shooting positions.
- CPLT-C1 Catapult: Uses his jump jets to merely advance a little and land behind a hill in the Y fork of the river. He now has a clear field of fire over the river, but remains difficult for the enemy to hit.
- GRF-1N Griffin: Jumps to the direct bank of the river. Its task is to serve as an outpost. By jumping, he builds up enough defense modifier.
- Drillson & Saracen Hover Tanks: Both vehicles drive directly into or just before the river. As they hover, they suffer no speed penalty. They position themselves in the water, kept slightly to the left to support the left flank in the attack.
- Advantage: You can use the river as a lane to quickly change sides if necessary.
2. the left flank (the attack) – “full throttle”
Lance 2 (Wolverine, Jenner, Saladin, Pegasus)
This is where the real action happens. We want to gain space at all costs.
- Saladin & Pegasus Hover Tanks: Both vehicles utilize their full flank speed. They race forward along the leftmost edge of the map. They cover an enormous distance in turn 1 and are already at the center of the map at the end of the turn. Their TMM (Target Movement Modifier) is high at a value of 3, making them almost impossible to hit at medium and long range, even in an open field.
- JR7-D Jenner: Jumps as far forward as possible to the left. He keeps pace with the hovercrafts and covers their inside flank.
- WVR-6M Wolverine: Also advances with jump jets, but remains somewhat more central than the Jenner. It forms the hinge between the “anvil” hold on the right and the far advanced “hammer” attack on the left.
Status at the end of round 1
If we now look at the tactical map, we no longer see a straight line. Our line-up resembles a diagonal line “/”:
- Bottom right: The anvil stands stable and covered on the riverbank, ready to receive any opponent who dares to enter its center.
- Top left: The hammer is far forward in the open field, ready to threaten the opponent’s deployment zone next turn.
Conclusion of the round: We seized the initiative without firing a shot. The opponent must now react: If he turns to the right to intercept our attack (Saladin/Jenner), he exposes his other flank for the Griffin and possibly the Drillson and Saracen. If he ignores the attack, we will fall behind him in turn 2 or 3.
Transparency notice on the use of AI (in accordance with the EU AI Act):
The content of this blog is personally conceived, researched and defined by me. I use generative artificial intelligence to help me formulate and structure the texts.
Why? This enables me to prepare complex issues more precisely and to focus fully on the quality of the content and research. The final editorial control and responsibility for all published content lies solely with me.
Together for better content!
This blog is a project of the heart that can only continue to grow with your help. Every comment, every recommendation – and especially your financial support – secures the future of this platform.
Do you want this content to remain freely accessible?
This is how you can support the mission:
- NEWSLETTER REGISTRATION: Become part of the fast-growing community and never miss an update again!
- BECOME A PATREON MEMBER: Join the inner circle and get access to exclusive material and early releases.
- OTHER SUPPORT: Whether it’s a donation, sharing a post or recommending the blog to others – every form of support counts!
Let’s make this blog an even better place together!

Ich bin Sören Spieckermann, der Kopf hinter mechstrategen. Seit Jahren faszinieren mich taktische Tabletop-Schlachten und die strategische Tiefe von Mechs. Ob schnelle Gefechte in Halo: Flashpoint oder epische Schlachten bei BattleTech Alpha Strike – hier teile ich meine Erfahrungen und Taktiken mit dir. Mein Ziel? Sowohl Einsteigern den Start zu erleichtern als auch alten Hasen neue Impulse für das nächste Match zu geben.