Tactical analysis: Operational area “Open terrain with urban zone”
The “Open Terrain with Urban Zone” operation area is one of the most tactically demanding maps in BattleTech Alpha Strike. It is a hybrid that forces commanders to not only master one strategy, but to apply two completely different doctrines simultaneously.
Two worlds collide here: the deadly confines of the urban combat in the center and the merciless, wide lines of sight of the periphery. If you try to win with a single unit type strategy, you will fail. The key to victory lies in specialization and synergy.

Here are the strategic pillars for this hybrid battlefield:
1. the center: The fortress (The Anvil)
The urban zone in the middle is often the primary mission objective. Whoever holds the city wins the scenario. But to hold it, you need steel, not speed.
- Heavy Brawlers are mandatory: In the center, range is useless. Armor and raw damage at close range reign here. An Atlas or King Crab can block a lane here almost single-handedly.
- Use cover: Your units in the center must use the buildings as a shield against the snipers in the open field. Move from block to block (“building hopping”) to never provide a direct line of sight (LOS) to the enemy long-range mechs at the edge of the map.
- The city as a trap: Lure the enemy into the city. If he tries to bypass your brawlers with light units, force him into close combat where your AC/20 and SRMs dominate.
2. the periphery: the death zone (The Hammer)
The open area around the city is the hunting ground for long-range weapons. Your task here is to control the terrain (area denial).
- Range is safety: Use mechs with a long range, such as the Archer, Warhammer or Marauder. Position them so that they cover every corridor leading into or out of the city.
- Indirect fire (IF) rules: The open field often offers little hard cover. LRM carriers(Catapult, Longbow) can stand safely behind hills or forests at the edge of the map and rain down their cargo over the city into the center.
- Sniper positions: A well-placed sniper with gauss guns or PPCs can prevent the enemy from sending reinforcements into the city. It isolates the enemy units in the center until your brawlers have finished them off.
3. synergy: the connection between the two worlds
The biggest mistake is to let both groups (city team and field team) fight in isolation. They must function as one organism.
- Spotting from cover: Your brawlers and infantry in the city center are the eyes (spotters) for your LRM boats in the open field. A Hunchback in the city can mark a target without having to shoot itself, while the Archer delivers the missiles from outside.
- Hammer and anvil: Your troops in the open field drive the enemy into the city (because it’s too dangerous outside). Your heavy mechs are waiting there. Or vice versa: Your heavy mechs drive the enemy out of the city, where they are then picked apart by your snipers.
Summary of unit recommendations
| Role | Ideal properties | Example units | Field of application |
| Zone Controller (Brawler) | Maximum armor, high short-range damage (AC/20, SRM) | Atlas, King Crab, Hunchback 4G | City center (hold mission objectives) |
| Spotter | Infantry, jump jets, hard to hit | Elementals, Spider, Jump Infantry | City center (mark destinations) |
| Fire Support (Indirect) | Ability IF, large LRM launchers | Catapult C1, Archer, Longbow | Open field (behind hills) |
| Sniper / Overwatch | High long-range damage, good heat control | Marauder, Warhammer, Awesome | Open field (block lines of sight) |
Sample lances
Here is an optimized set of two lances (8 units in total) specifically tailored to this tactic.
Lance 1: “Long Range Suppression” (The Field Team)
Task: Dominate the lines of sight in open terrain, destroy enemies approaching the city and provide indirect fire support for the city team.
- Schrek PPC Carrier (The centerpiece)
- Role: Sniper
- Why: As desired, this is the king of the open field. With 3 PPCs, it delivers massive damage at long range. As it is a vehicle and has less structure than a mech, it is imperative that it is positioned far back, ideally in cover (forest/hill) but with clear fire corridors. It punishes any enemy that pokes its head out of the city.
- Archer ARC-2R (or Longbow)
- Role: Indirect Fire Support (IF)
- Why: The perfect complement to the Schrek. While the Schrek needs direct lines of sight, the Archer uses its LRM-20 launcher to fire at targets in the city that the Schrek cannot see using the special ability
IF(Indirect Fire). All it needs is a spotter from Lance 2.
- Warhammer WHM-6R
- Role: Bodyguard / Mid-Range Sniper
- Why: The Schrek and Archer are vulnerable to fast flankers. The Warhammer has enough range (PPCs) to help with shelling, but also enough melee potential (SRMs, lasers) to intercept light mechs.
- Ostscout OTT-7J (or Spider SDR-5V)
- Role: Forward Observer / Spotter
- Why: This lance needs eyes. The Ostscout has hardly any weapons, but is extremely fast and agile (jump jets). It runs to the edge of the city or to high positions in the open field to mark targets for the Archer (spotting) without exposing itself to fire from the city brawlers.
Lance 2: “Urban Crushers” (The City Team)
Task: Capture the center, use of cover, extreme damage at short range.
- King Crab KGC-000
- Role: Juggernaut / Zone Denial
- Why: In the narrow streets of the city, speed doesn’t matter, armor and fear factor are everything. The King Crab with its two AC/20s is the ultimate deterrent. It blocks the main street in the city center. No opponent will willingly turn the corner if this monster is waiting there.
- Hunchback HBK-4G
- Role: Brawler / Ambush
- Why: The little brother of the King Crab. Cheap in points, but deadly in the city. It uses the buildings to sneak up on enemies and fire its AC/20 at point blank range. He also acts as a bodyguard for the King Crab.
- Grasshopper GHR-5H
- Role: Skirmisher / Jumper
- Why: Vertical mobility is important in the city. The Grasshopper has jump jets to leap over buildings and stab enemies in the back (rear arc). It is very tough (zombie mech) and has no ammunition that can explode – perfect for long-lasting battles.
- Maxim Heavy Hover Transport (with infantry)
- Role: Rapid reaction force / spotter transport
- Why: A hovercraft is extremely fast on the flat city streets. The Maxim brings massive SRM fire (Crit-Seeking) and ideally transports a squad of Battle Armor or Jump Infantry.
- Tactics: The infantry is dropped off in a central building (spotter for the Archer from Lance 1), while the Maxim chases through the streets as a disruptive factor.
The synergy (how to play it)
- The setup: Position the Schrek and the Archer on a hill or at the edge of a forest in open terrain. The Warhammer stands slightly in front of it as a shield.
- The bait: Aggressively move the East Scout and Maxim forward to attract attention and “lure” targets (target lock).
- The trap: As soon as the opponent tries to seek cover in the city, King Crab and Hunchback are waiting there. If he tries to stay in the open field to avoid the Crab, he will be cut to pieces by the Schrek.
- The kicker: enemies hiding behind houses are shot at indirectly by the Archer (thanks to spotting by the Infantry/East Scout) until they have to move – directly into the arms of your Brawlers.
A practical example
In Alpha Strike, the first movement phase often determines victory or defeat. Even before the first shot is fired, we have to set our traps. We take a look at how our “Long Range Suppression” (field) and “Urban Crushers ” (city) move ideally in turn 1 on a map with a city center and open countryside.
The goal of round 1
We want to achieve two things:
- Area Denial: Make the open field so dangerous that no one wants to enter it.
- Entrenchment: Bring our melee fighters into the city in such a way that they cover the mission objectives without being able to be shot at.
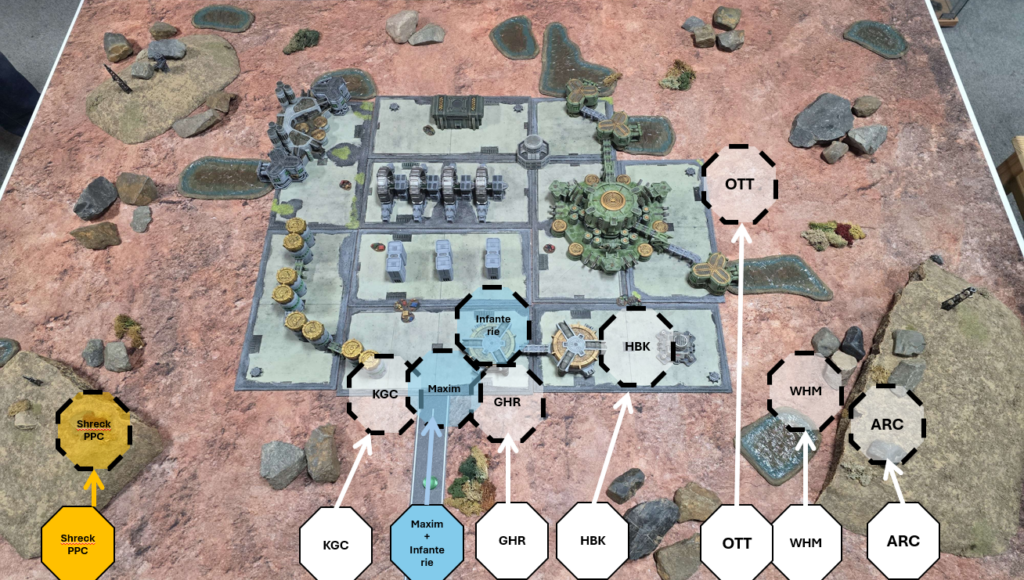
The playing field
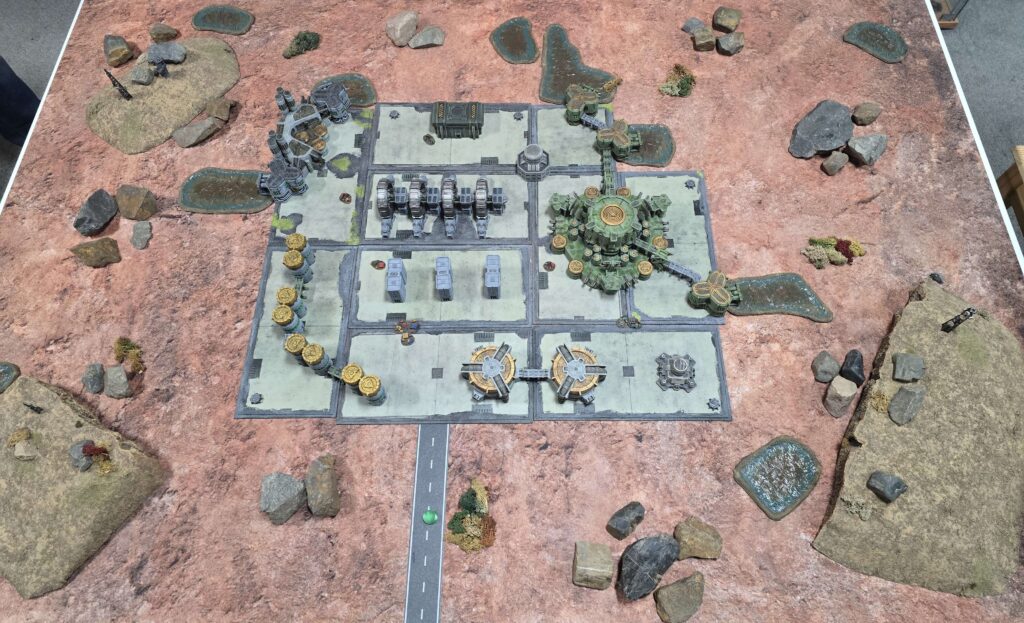
Playing field analysis:
This map layout is a classic in Alpha Strike and BattleTech, often referred to as “The Fortress” or “The Eye of the Storm”. It is deceptively simple tactically, but merciless for mistakes.
The layout:
- Center: A dense urban zone (visual blockades, hard cover).
- Periphery: Wide, open terrain without any significant cover (“No Man’s Land”).
- The anchor points: One hill each on the left and right flank in the open area.
Here is the tactical breakdown of the three critical zones:
Zone 1: The Death Hills (The Flanks)
The two hills in the open terrain are the most valuable real estate on this map – after the mission objectives themselves.
- Tactical value: Elevation is power. Whoever controls the hills dictates the game in the open field. A mech on a hill (level 1 or 2) can often see over low obstacles and gets improved lines of sight (LOS) deep into the periphery and even onto the roofs of the city.
- Use: This is the home of your lance 1 (field team).
- Park the Schrek PPC Carrier and the Archer here.
- From the hill, for example, they can go “Hull Down” (Partial Cover), which makes them harder to hit while dominating the open field.
- Danger: These hills are isolated. If fast enemy units (such as hovercrafts or light mechs) flank around the hill, your heavy guns cannot escape. The Warhammer must act as a “gatekeeper” here.
Zone 2: The ring of fire (The open field)
The area between your deployment zone and the city center is the most dangerous zone in the game. Plus the area around the urban zone.
- Tactical value: There is no protection here. Speed (TMM – Target Movement Modifier) is the only life insurance.
- Usage: You don’t want to stay here. You only want to go through here.
- For your Lance 2 (city team), the open field is a necessary nausea. Use the Maxim Hover to get infantry across this zone quickly.
- Never let your mechs(King Crab, Hunchback) stand still in this zone. Run (sprint), even if you can’t shoot. Anyone who stops here will be destroyed from the enemy hills.
- The trap: Force your opponent to stay here. If he tries to bypass your city defenders, he must pass through the ring of fire. This is the moment when your Schrek and Archer shine on the hill.
Zone 3: The fortress (the urban center)
As soon as you cross the ring of fire, the game changes completely. Range becomes irrelevant, positioning becomes everything.
- Tactical value: Buildings block lines of sight from the hills. This means that your troops in the center are safe from direct fire from the outside (but not from indirect LRM fire!).
- Utilization: Lance 2 rules here.
- Bottlenecks (choke points): The streets between the buildings channel the movement. Position the King Crab so that it can look down the longest straight road.
- Vertical level: Use the Grasshopper to jump onto the roofs. But be careful: on the roof, you will be visible again to the snipers on the hills! Only use the roofs briefly to fire or taunt, then jump back down.
The winning strategy: “crossfire control”
On this map, the winner is the one who understands the relationship between the hills and the city.
- Split Deployment: Don’t place your Lance 1 (ranged) in a pile, but use both mounds (or at least one mound and something similar on the other side) if the deployment zone allows it. This will create a crossfire. No matter on which side the enemy tries to approach or bypass the city, he will always be presented with a flank.
- Inside-Out Spotting: Your units in the city(East Scout, Infantry) look out of the windows. They mark targets in the open field for the Archer, who is safely behind or on the hill.
- The Turtle: Once Lance 2 is in town, they can’t get out. They force the opponent to come to them. And to get to them, the opponent has to go through the open field – where Lance 1 is waiting on the hills.
Conclusion on the map: This map punishes indecision. If you hesitate to cross the open field, you will die in the LRM rain. If you ignore the hills, you will be flanked. If you run blindly into the city, you will run into an AC/20. The trick is to control the zone crossings.
The tactical line-up
How do we implement this with the available units? Here is the distribution of tasks:
Lance 1: “Long Range Suppression” (The Field Team)
To fully exploit the potential of our lance 1 (fire support), we split the team. We form a static left flank and a flexible right flank.
1st The Left Flank: The Lone Guardian (Schrek PPC Carrier)
The Schrek PPC Carrier operates autonomously here. Its task is to protect the left side of the battlefield with the help of sniper tactics completely sealed off.
- The maneuver: In the first round, the Schrek moves aggressively towards the left hill. This is the only move he will make. From there, he has a dominant line of sight on the entire left flank and deep into the urban zone’s street canyons.
- The sniper advantage: From turn 2, the tank remains stationary. As a result, it benefits from the attack modifier for stationary units (-1 to its own hit roll, depending on the rule options/SPA used). It becomes a stationary weapon platform with maximum precision.
- Why not a bodyguard? The Schrek has the special ability TUR(3/3/3) (Turret Mount). This means it can unleash its powerful firepower at a 360-degree angle. Even if fast enemies try to get around him or get to his back, he simply turns the turret. He can defend himself, which allows us to use the points for a bodyguard more effectively elsewhere.
2 The Right Flank: The Hammer (Archer & Warhammer)
While the left side is kept static, we build up massive pressure on the right side.
- The Archer (fire base): It occupies the hill on the right. From this elevated position, it not only controls the right side, but also provides fire support for the entire playing field thanks to its LRMs (Long Range Missiles). No matter where the enemy appears – whether in the open field or hidden in the city (via indirect fire) – the Archer can reach him.
- The Warhammer (the bodyguard): He secures the foot of the hill and the immediate surroundings. Its task is to intercept anything that tries to threaten the Archer at close range. He can also advance together with the East Scout to take the right flank and then swing into the center.
3. the eye of the storm: the east scout
The East Scout is the link on the right flank. He uses his outstanding speed not for combat, but for reconnaissance.
The mission: He acts as a spotter. By getting into the enemy’s rear or on the flank of the city buildings, he provides the target coordinates for the Archer on the hill. He makes the enemy visible without giving them a chance to hide.
The route: It avoids the urban zone by taking a wide berth on the right flank.
Lance 2: “Urban Crushers” (The City Team)
While our flanks control the open field, the battle for the mission objectives is decided in the center. Here we rely on brute force, supported by surgical mobility.
1. the anvil: King Crab & Hunchback
There is only one order for our two melee monsters in round 1: Advance. The Hunchback and the King Crab must reach the protective architecture of the urban zone as quickly as possible. They are targets in the open field, but as soon as they have reached the first blocks of houses, they dictate the action. Their mission is static: hold the center. They turn the streets into death zones that no opponent can enter with impunity.
2. the joker: Grasshopper
The Grasshopper is our tactical chameleon. It is not tied to one position, but serves as a mobile reaction element. Its jump jets open up three strategic options, depending on the opponent’s behavior:
- Option A (Bodyguard): Intercepts fast units trying to break through to our lone Schrek PPC Carrier via the left flank.
- Option B (pressure buildup): He jumps to the right flank to support the advance of the East Scout and Warhammer and overstretch the enemy line.
- Option C (Deep Strike): The most aggressive variant – “Down the middle”. He uses the roofs of the city to jump over the front line and fall directly into the enemy’s back (rear arc).
3rd Combined Arms: Maxim & Infantry
The Maxim Heavy Hover Transport is more than just a cab. It brings the infantry into the heart of the battle at high speed.
The Maxim: He does not retreat after being set down. He uses his high speed in the lanes to chase SRMs into the flanks of the enemy. It acts as a direct fire support (“force multiplier”) for the King Crab and the Hunchback, looking for critical hits where the big mechs have torn open the armor.
The infantry: As soon as they are deployed, they barricade themselves in or on a central building (ideally directly on the objective). There they dig themselves in, provide spotting data and are extremely difficult to dislodge.
Transparency notice on the use of AI (in accordance with the EU AI Act):
The content of this blog is personally conceived, researched and defined by me. I use generative artificial intelligence to help me formulate and structure the texts.
Why? This enables me to prepare complex issues more precisely and to focus fully on the quality of the content and research. The final editorial control and responsibility for all published content lies solely with me.
Together for better content!
This blog is a project of the heart that can only continue to grow with your help. Every comment, every recommendation – and especially your financial support – secures the future of this platform.
Do you want this content to remain freely accessible?
This is how you can support the mission:
- NEWSLETTER REGISTRATION: Become part of the fast-growing community and never miss an update again!
- BECOME A PATREON MEMBER: Join the inner circle and get access to exclusive material and early releases.
- OTHER SUPPORT: Whether it’s a donation, sharing a post or recommending the blog to others – every form of support counts!
Let’s make this blog an even better place together!