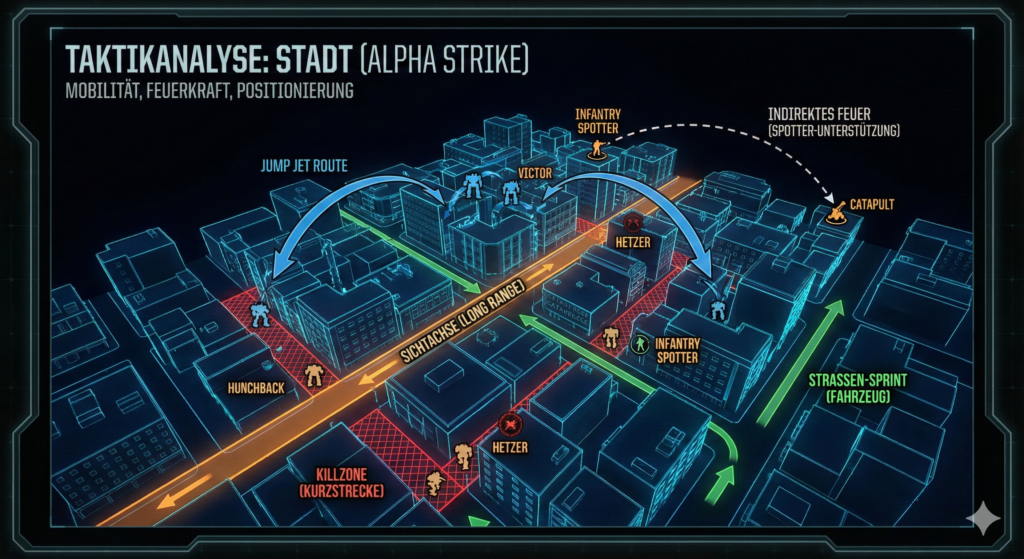
City combat is one of the deadliest and most chaotic disciplines in Alpha Strike. In contrast to the open field, where range dominates, positioning, mobility and ambush reign in the city. The lines of sight (LOS) are short and cover is plentiful.
Here are the four pillars of urban tactics:
1. Mobility: Using the third dimension
In a city, the ground is often an obstacle course. Buildings not only block the view, but also the path.
- Jump jets are king: Mechs with the “J” movement type are worth their weight in gold in urban combat. They can jump over buildings to:
- Retreat quickly when flanked.
- To get into the opponent’s back (Rear Arc Attack).
- Landing on the roofs of buildings to get better lines of sight for a short time (caution: high risk of being seen yourself).
- Vehicles on roads: While mechs jump over houses, fast vehicles dominate the asphalt. Wheeled and hover vehicles often receive movement bonuses on roads (depending on house rules or optional rules) or can at least use their full speed without terrain penalties.
- Tip: Use fast hovercrafts or wheeled scouts to quickly break through main roads and stab the enemy in the back.
2. Firepower: Short-range and indirect fire
The average combat distance in the city drops drastically. “Sniping is rarely possible.
- Brawlers dominate: Units with high damage at short (short) and medium (medium) range are to be preferred. A Hunchback or Atlas is more frightening here than an Archer, which relies on direct vision.
- Indirect fire (IF) is the key: as buildings block direct vision, the ability
IF(Indirect Fire) is extremely powerful. You can shoot at opponents without them being able to shoot back.- The spotter role: You need units that can see the enemy (have line of sight) but are difficult to hit themselves.
- Infantry as spotters: Infantry are MVP (Most Valuable Player) in urban combat. Place them in buildings (provides massive cover and makes them hard to eliminate). From there, they “mark” targets for your LRM carriers or artillery that are safely behind skyscrapers.
3. Sightlines & Fire corridors (fire lanes)
Although the range is usually short, there are exceptions: The long, straight roads.
- The sniper corridor: Place 1-2 units with long range and high damage at the very end of a long main road.
- Purpose: This is not an offensive position, but “Area Denial”. Any opponent who carelessly enters or drives along the road will be punished. This forces the opponent to take slower and longer routes through alleys or over buildings.
4. The kill zone: The “street canyon trap”
This is the most effective method of eliminating superior enemy units.
The setup: Imagine an intersection or a section of road. You position two units on opposite corners of a street (or diagonally opposite).
The implementation:
- The bait: Leave the area seemingly open.
- The trap: As soon as the enemy turns into the road or advances, your units open fire.
- The advantage:
- Crossfire: The opponent takes damage from two sides.
- No cover: Since you shoot from the flank or corner, the opponent often cannot claim partial cover.
- Back armor: If you gain the initiative and only move after the opponent has run into the street, you can often jump or drive into his back.
Summary of unit recommendations
| Role | Ideal properties | Example units |
| Striker / Flanker | High TMM, jump jets, high melee damage | Phoenix Hawk, Wraith, Grasshopper |
| Ambusher (Ambush) | Slow, massive armor, extremely high short-range damage (AC/20) | Hunchback, King Crab, UrbanMech, Hetzer |
| Spotter | Infantry (hard to hit in buildings), jump infantry or light mechs | Standard Foot Infantry, Battle Armor, Locust, Stinger |
| Fire Support | Ability IF (Indirect fire) | Catapult, Archer, LRM-Carrier |
| Sniper | High long-range damage (only for road ends) | Warhammer, Marauder (at the end of the road) |
An important note on the initiative
Initiative is more important in urban combat than in the open field.
- If you lose the initiative: retreat to cover or use jump jets to break the line of sight completely.
- If you win the initiative: Wait until the opponent has moved into an alley and then close the trap (killzone) with your moving units.
Sample lances
Here is an optimized set of two lances (8 units in total) specifically tailored to your urban combat tactics.
The concept relies on high mobility (jump jets/speed) for the flanks and massive firepower at short range for the kill zones.
Lance 1: The “Street Sweepers” (Assault & Ambush)
Task: Lure the enemy into the kill zones, block roads and destroy them in close combat.
- Victor (VTR-9B)
- Type: BattleMech (Assault)
- Why: The perfect city assault. It has jump jets to leap over blocks of houses and stab opponents in the back. Its AC/20 delivers massive damage at short range.
- Hunchback (HBK-4G)
- Type: BattleMech (Medium)
- Why: The king of urban combat. He may be slow, but he’s deadly in a narrow alley.
- Tactic: Place him on the corner of a house. He is the “hammer” in your “house corner trap”. Nobody voluntarily turns a corner with a Hunchback waiting behind it.
- Hetzer Wheeled Assault Gun (AC/20)
- Type: Vehicle (wheel drive)
- Why: A wheeled vehicle that uses the movement bonus on roads. It’s cheap, poorly armored, but carries an AC/20.
- Tactic: A pure ambush vehicle. Park it in a cross street. As soon as an opponent passes by -> Shoot and retreat.
- Saladin Assault Hover Tank
- Type: Vehicle (Hover)
- Why: Extremely fast. Ignores water (canals in the city park) and road surfaces.
- Tactics: He uses his speed to race through long streets and finish off damaged opponents (finisher).
Lance 2: The “roof bunnies” (Support & Recon)
Task: Secure lines of sight, spotting for indirect fire and sealing off long road corridors.
- Griffin (GRF-1N)
- Type: BattleMech (Medium)
- Why: Your “corridor guard”. Equipped with a PPC for long range and jump jets.
- Tactics: He positions himself at the end of a long main street. Its range forces the opponent into the side alleys (exactly where Lance 1 is waiting).
- Longbow (LGB-0W)
- Type: BattleMech (Assault)
- Why: The specialist for indirect fire (IF).
- Tactics: It does not require line of sight (LOS). It fires its LRM volleys over the houses at targets marked by the infantry.
- Alternative: Catapult. Less IF firepower, but jump jets.
- Maxim Heavy Hover Transport
- Type: Vehicle (hover/transporter)
- Why: A fast troop transport vehicle with its own firepower. It quickly brings the infantry deep into the city center.
- Tactics: Deploy the infantry at a central tall building and then support them with your own lasers.
- Jump Infantry Platoon (SRM)
- Type: Infantry (Jump-capable)
- Why: The ideal spotters. Thanks to jump modules, they can hop from roof to roof without stepping onto the street. They are extremely difficult to hit inside buildings.
- Tactics: They “light up” targets for indirect fire from the Longbow and annoy opponents with short-range missiles (SRM) from above (top armor hits possible, depending on house rules).
Summary of synergies
- The spotter chain: The Jump Infantry jumps onto a high-rise building -> sees the enemy -> radios the Longbow -> Longbow fires missiles over the building. Risk-free damage.
- The street trap: The Griffin stands at the end of the street and fires. The opponent dodges into an alley to seek cover. The Hunchback is waiting at the corner (Point Blank Shot).
- Flanking: While the opponent is busy with the Hunchback, the Victor jumps over the block and lands behind the opponent (Rear Arc Attack).
A practical example
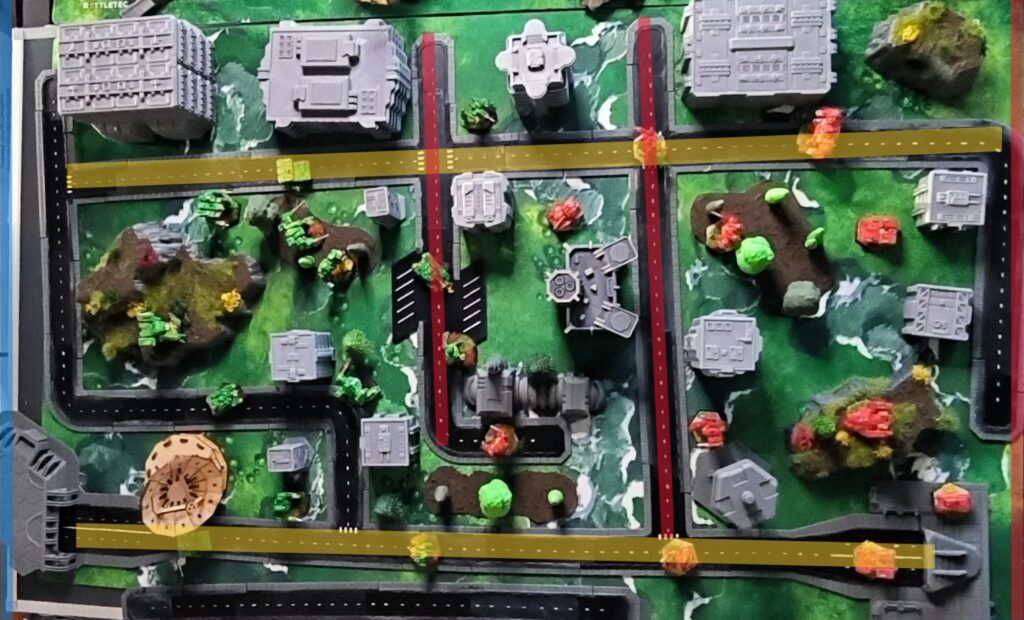
In the practical example, we only use the “Lance 1: The “Street Sweepers” (Assault & Ambush)” and the “Lance 2: The “Roof Bunnies” (Support & Recon)”. The player has the red deployment zone (right edge of the pitch).
Let’s take a closer look at a classic urban combat situation. Anyone who has ever maneuvered their lance through narrow urban canyons knows that different rules apply here than on the open field. Lines of sight are short, ambushes lurk around every corner and the right positioning determines victory or defeat.
Here is my analysis of the pitch and the battle plan for the upcoming battle.
Playing surface
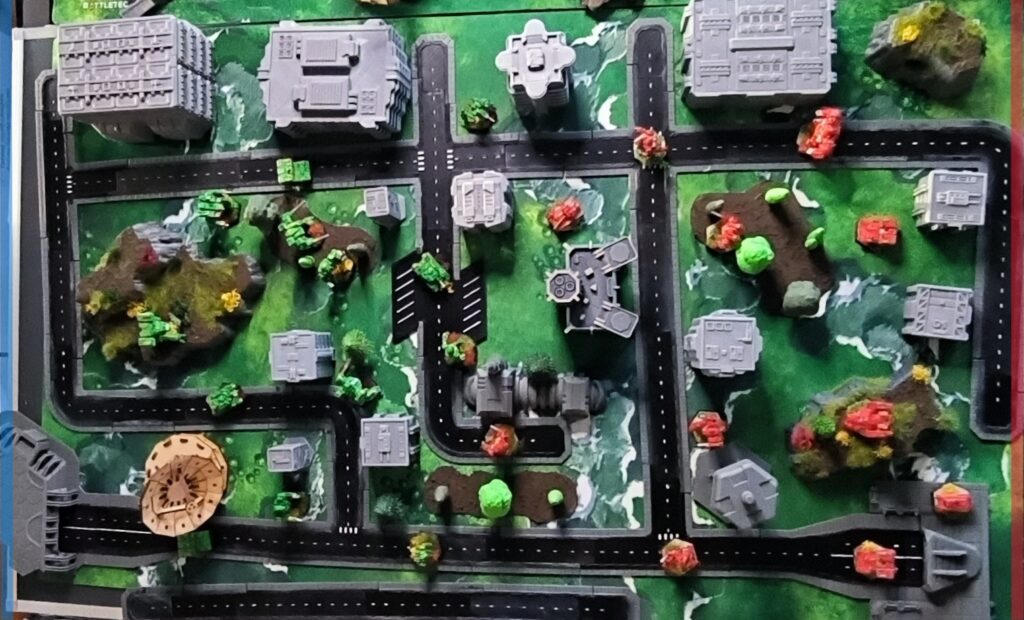
Playing field analysis: – The concrete jungle
We are fighting in a densely built-up urban area. The terrain is characterized by roads, isolated small wooded areas and buildings that massively restrict the lines of sight. Nevertheless, there are prominent points that we have to use:
- The topography: Three hills offer potential height advantages (top right, bottom right and center left).
- The death zone: In the absolute middle is a parking lot. This medium-sized open space is tempting but dangerous – anyone standing here is presented as if on a silver platter.
- Fire corridors (see map):
- Yellow: There are two long main axes that run across the field. These are our primary fire channels for ranged combat.
- Red: Cross roads provide cover and opportunities for maneuvering, but also break the lines of sight.
The strategy: Hold and embrace
Note on positioning: Of course, a lot depends on the opponent’s positioning in an emergency. In order not to go beyond the scope of this article, we will concentrate purely on my proactive strategy and how I want to impose my game on the opponent.
My basic strategy for this match is classic but effective: “anvil and hammer“.
The plan: We force the opponent to bite at a hard defensive line in the middle (the anvil), while a rapid reaction force comes across the flank to roll him up and pincer him (the hammer).
The tactical line-up
How do we implement this with the available units? Here is the distribution of tasks:
1. The fire support (The Anvil – Part 1)
Unit: Longbow (LGB-0W) + Infantry + Maxim
The longbow is the backbone of our ranged combat capacity. It is positioned so that it covers one of the long yellow lines of sight. However, its main task is indirect fire. It is designed to wear down the advancing enemy even before direct visual contact is made.
- Support: The infantry serve as spotters. They hide in the buildings or small woods, mark targets and enable the Longbow to deliver its LRM volleys safely to the target without exposing itself.
2. The trap (The Anvil – Part 2)
Units: Hetzer Wheeled Assault Gun (AC/20) + Hunchback (HBK-4G)
This is a nasty surprise for anyone who ventures into the center. The Hetzer and the Hunchback secure the center around the parking lot.
- The aim: Both units have devastating firepower at short range (AC/20!). They are designed to create crossfire situations. Any opponent who breaks through the center runs straight into a wall of lead.
3. The bait
Unit: Victor (VTR-9B)
Victor plays a risky but crucial role. As a heavy mech, it attracts attention. It is designed to be aggressive and “lure” the enemy.
- The maneuver: As soon as the enemy bites and pursues the Victor, the latter retreats in a targeted manner to draw the pursuers directly in front of the Hetzer’s and Hunchback’s pipes.
4. The hammer (the flank)
Units: Griffin (GRF-1N) + Saladin Assault Hover Tank
While the enemy is busy with the Victor and our hard center, the hour of the fast units strikes. The Griffin and the Saladin use their high mobility to bypass the flank.
- The aim is to get to the enemy’s rear. A Saladin that reaches the rear of an enemy mech with its speed can decide the battle in one round.
Conclusion on strategy and tactics
The key to winning on this map lies in discipline. The center must hold long enough for the flankers to get into position, and the Victor must not sacrifice himself too early. If the timing is right, the opponent will be pulverized between the hammer (Griffin/Saladin) and the anvil (Hunchback/Hetzer).
The line-up and first movements

1. The “kill zone” (center & right flank)
Units: Hunchback & Hetzer
We move the Hunchback and the Hetzer to the corners of two neighboring buildings. This positioning is crucial:
- The crossfire: This formation causes the two units to form a deadly “kill zone” (marked red in the graphic). Any opponent who enters this area must face the concentrated short-range fire of both units.
- Division of tasks: While the Hunchback primarily blocks the center, the Hetzer also covers the right flank with its AC/20. No light mech will dare to break through there lightly.
2. The flexible anchor (center)
Units: Victor & Maxim Hover Transport
Victor takes up a central position at the corner of a house. From here, he controls the cross street. His position is chosen so that he can act as a “libero”: He holds the center, but can immediately rotate across the street to reinforce the left or right flank if necessary.
At the same time, the Maxim troop transporter uses its speed to cross the upper road behind the central building.
- Deployment: The infantry sits down and occupies the building (or the roof, for better lines of sight).
- Support: Once deployed, the Maxim reinforces the defense of the center. Thanks to its high speed, it can – just like the Victor – be deployed at lightning speed via the crossroads to any focal point of the battle.
3. Fire superiority (rear area)
Units: Longbow & Infantry (Spotter)
The longbow takes up position at the far end of the long street at the corner of a building.
- Area control: It dominates the entire upper visual corridor. Nobody can use this road without risking a volley of LRMs.
- Indirect fire: For the rest of the playing field, it acts as artillery. This is where the infantry in the center come into play: from their elevated position in the building, they act as primary spotters and direct the Longbow’s fire precisely at targets that are not visible to the mech itself.
4. The flanking maneuver (left)
Units: Griffin & Saladin
While the center digs in, the Griffin and Saladin step on the gas. They move aggressively along the lower long road on the left flank. Their mission is simple: use speed, don’t get involved in combat and get into the rear of the enemy formation as quickly as possible to attack the soft rear armor of the enemy.
Transparency notice on the use of AI (in accordance with the EU AI Act):
The content of this blog is personally conceived, researched and defined by me. I use generative artificial intelligence to help me formulate and structure the texts.
Why? This enables me to prepare complex issues more precisely and to focus fully on the quality of the content and research. The final editorial control and responsibility for all published content lies solely with me.
Together for better content!
This blog is a project of the heart that can only continue to grow with your help. Every comment, every recommendation – and especially your financial support – secures the future of this platform.
Do you want this content to remain freely accessible?
This is how you can support the mission:
- NEWSLETTER REGISTRATION: Become part of the fast-growing community and never miss an update again!
- BECOME A PATREON MEMBER: Join the inner circle and get access to exclusive material and early releases.
- OTHER SUPPORT: Whether it’s a donation, sharing a post or recommending the blog to others – every form of support counts!
Let’s make this blog an even better place together!